Tuesday, September 27, 2011

Craft Monday: Tissue paper Flower Centerpieces & Cards

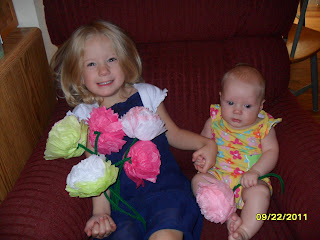
We decided to make some tissue paper flowers as centerpieces for Alayna's birthday party. I used to make these in Spanish classes for Cinco de Mayo and El Dia de los Muertos. They're super easy and fun to make and all you need is some tissue paper and green pipe cleaners. For detailed instructions, you can check out this website. Here are the girls helping out and showing off our finished flowers.


Aren't they so sweet?


Here are our completed centerpieces!


After Alayna's party we, of course, had a lot of extra tissue paper from gift bags, so I thought it would be nice to use some of that paper to make our thank you cards. See our stack of paper:


I folded and stacked up one piece of each color, then had Alayna trace around a candle and some glasses to make circles of three different sizes. (Ha ha! You can see Ranch dressing in the background because we had a veggie snack right before starting. No Ranch is required for this project!)


We took a pencil, put the eraser in the center of each circle, and twisted. Then we glued a large, medium, and small flower on top of each other onto folded cardstock.


Alayna then used a green marker to draw a stem and we cut fringe in green tissue paper for grass and glued it on. Here's Alayna (excuse me, I mean Snow White!) with two of the finished cards. Thanks again to everyone who came to our party and to all of our family who sent such great presents!

Happy 3rd Birthday Princess Alayna!


Alayna's 3rd birthday was on Sunday. We had a really nice princess party at our house. We ended up having eight kids at the party and we were blessed with beautiful 80 degree weather.


Cecily was amazingly good as I was running around taking care of everyone, and she had fun playing with the other babies!


I made a princess cake based on this online tutorial, but I added the cool edible princess decals to each side and the purple embellishments. It turned out pretty good and was delicious too!


Alayna had so much fun and got a lot of great presents! Here she is playing with some of her favorite ones.

Monday, September 19, 2011

Craft Monday: Silk Flower Barrettes

Alayna and I love to do craft projects, so I decided to make Mondays a regular craft day. That way, I can plan what we will do and get supplies over the weekend if needed. For our first official Craft Monday, we made some more of our silk flower barrettes. We made a few of these at the beginning of the summer and liked them so much we decided we needed some more in different colors. Flower hair clips like this can be purchased for $4.00 or more, but you can easily make your own just the way you want them for much less money!


Step 1: Collect your supplies, which include silk flowers, spring hair clips, fabric ribbon, scissors, a glue gun, craft embellishment for center of flower if wanted. I got the flowers on sale at Hobby Lobby for $0.50 to $1.50 each.


Step 2: Feed baby, put her in swing, and hope she falls asleep. This is not a one-handed kind of project!


Step 3: Take the flowers off their stems, pop off the plastic centers, and pull apart the layers.


Here's Alayna helping me by sorting the flower layers into small, medium, and large sizes.


Step 4: Rearrange the flower layers as desired, using different colors and sizes. Alayna has fun creating the new flowers and playing with different arrangements. For the centers, you can use the original centers of the flowers, craft crystals, buttons, or whatever you want. Hot glue each layer together and hot glue the center piece on.


Step 5: Cut fabric ribbon into small pieces to fit over spring clips and hot glue onto flat side of the clips. Finally, hot glue fabric side of the the clips to the back of flowers.


Here are all of our finished flower barrettes, and Alayna modelling one.